HewDraw Remix (HDR) - Netplay Guide

This guide assumes you already have HDR set up on your Steam Deck, and that you’re using a GameCube controller for your controls. A keyboard and mouse will also come in handy. If you don’t have HDR set up on Steam Deck, follow my previous guide.
1. Configure Profile and Settings
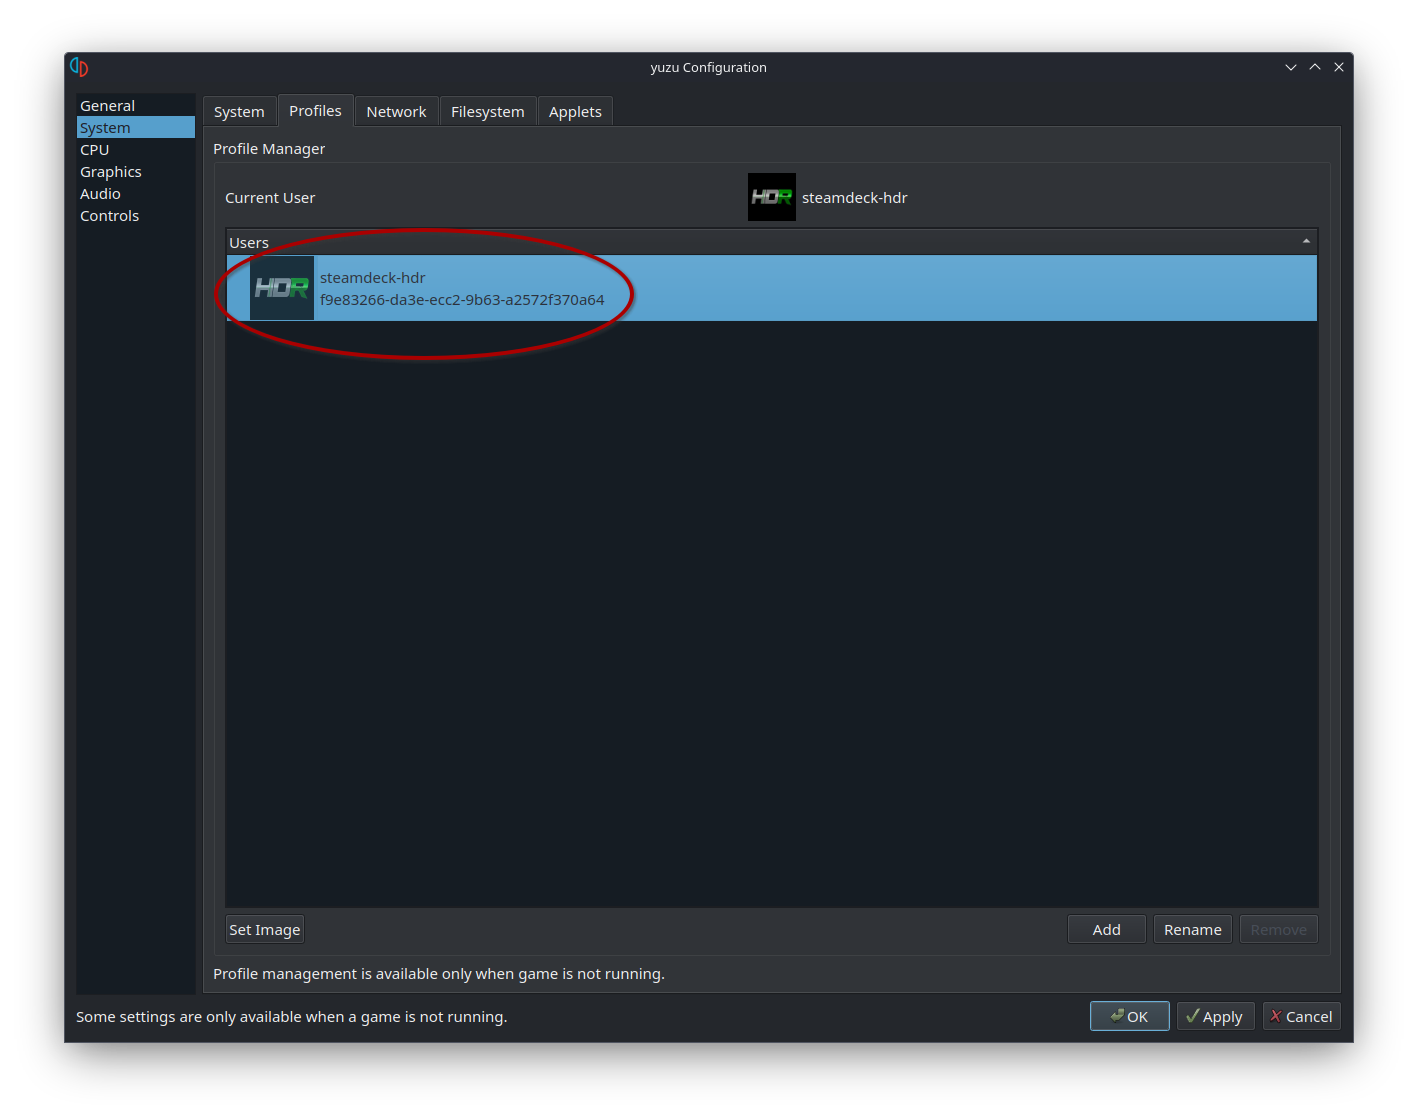
Open Yuzu. Open the configuration menu by going to Emulation -> Configure… From the System section on the left, go to the Profiles tab. Here, you can set a custom name for your profile and select a profile icon with your file manager. In my case I renamed the default “yuzu” profile to “steamdeck-hdr” and downloaded the HDR icon so I could use it for my profile picture.
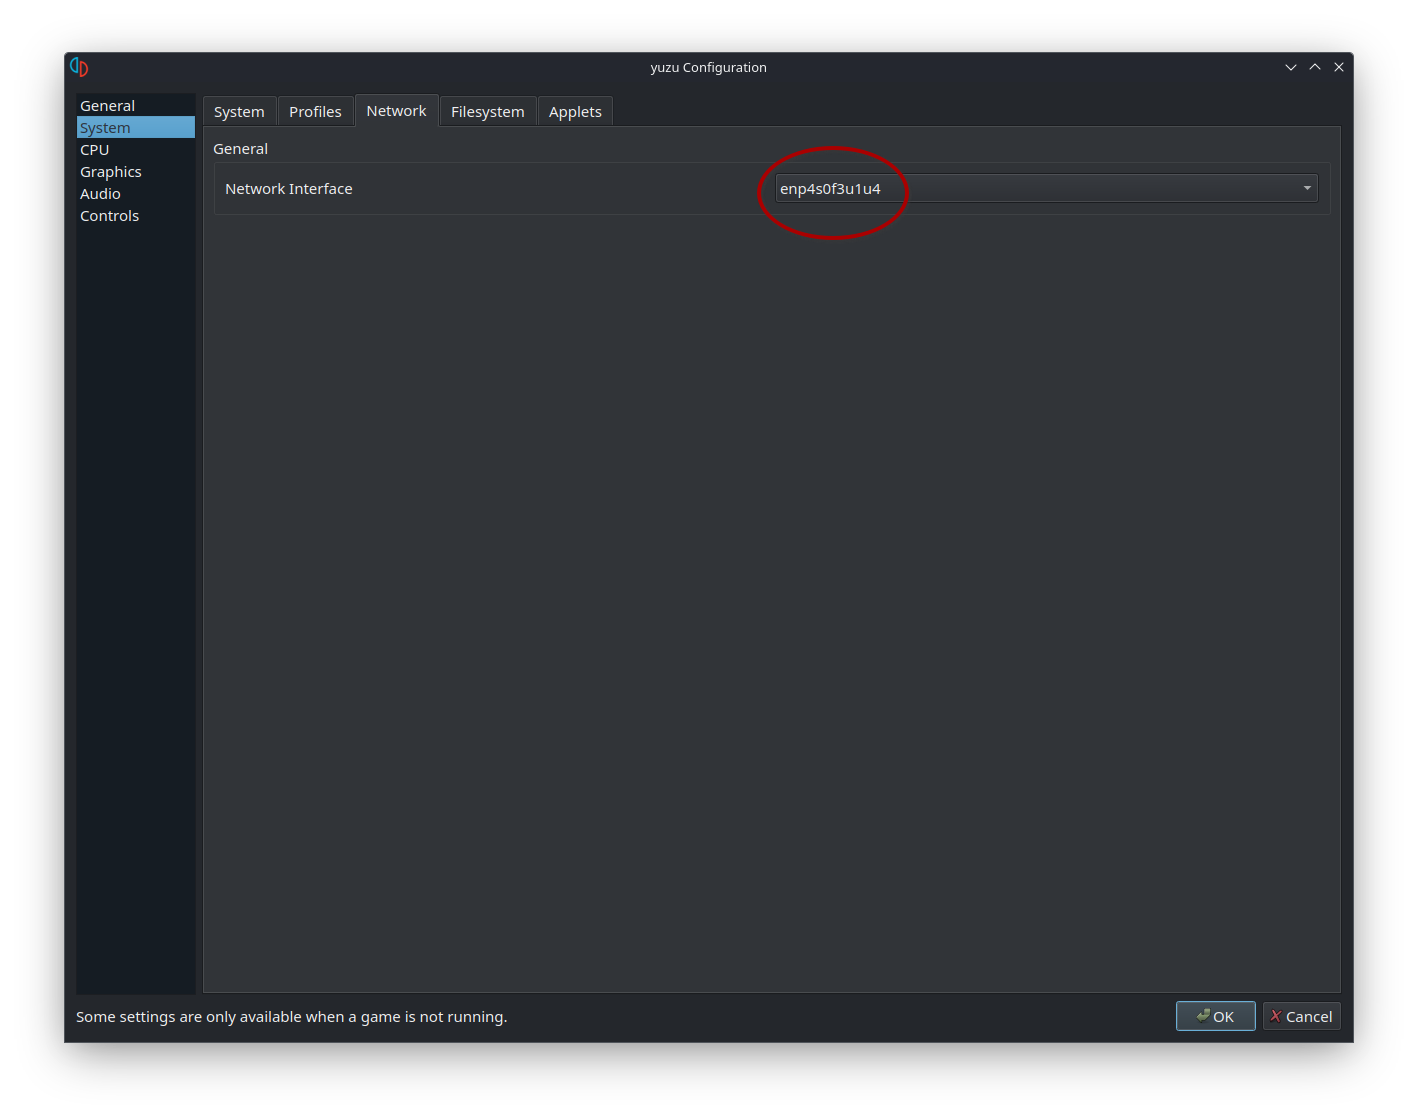
In the next tab, Network, make sure you have your network interface selected from the drop-down menu. Please use Ethernet via a USB-C dock if at all possible.
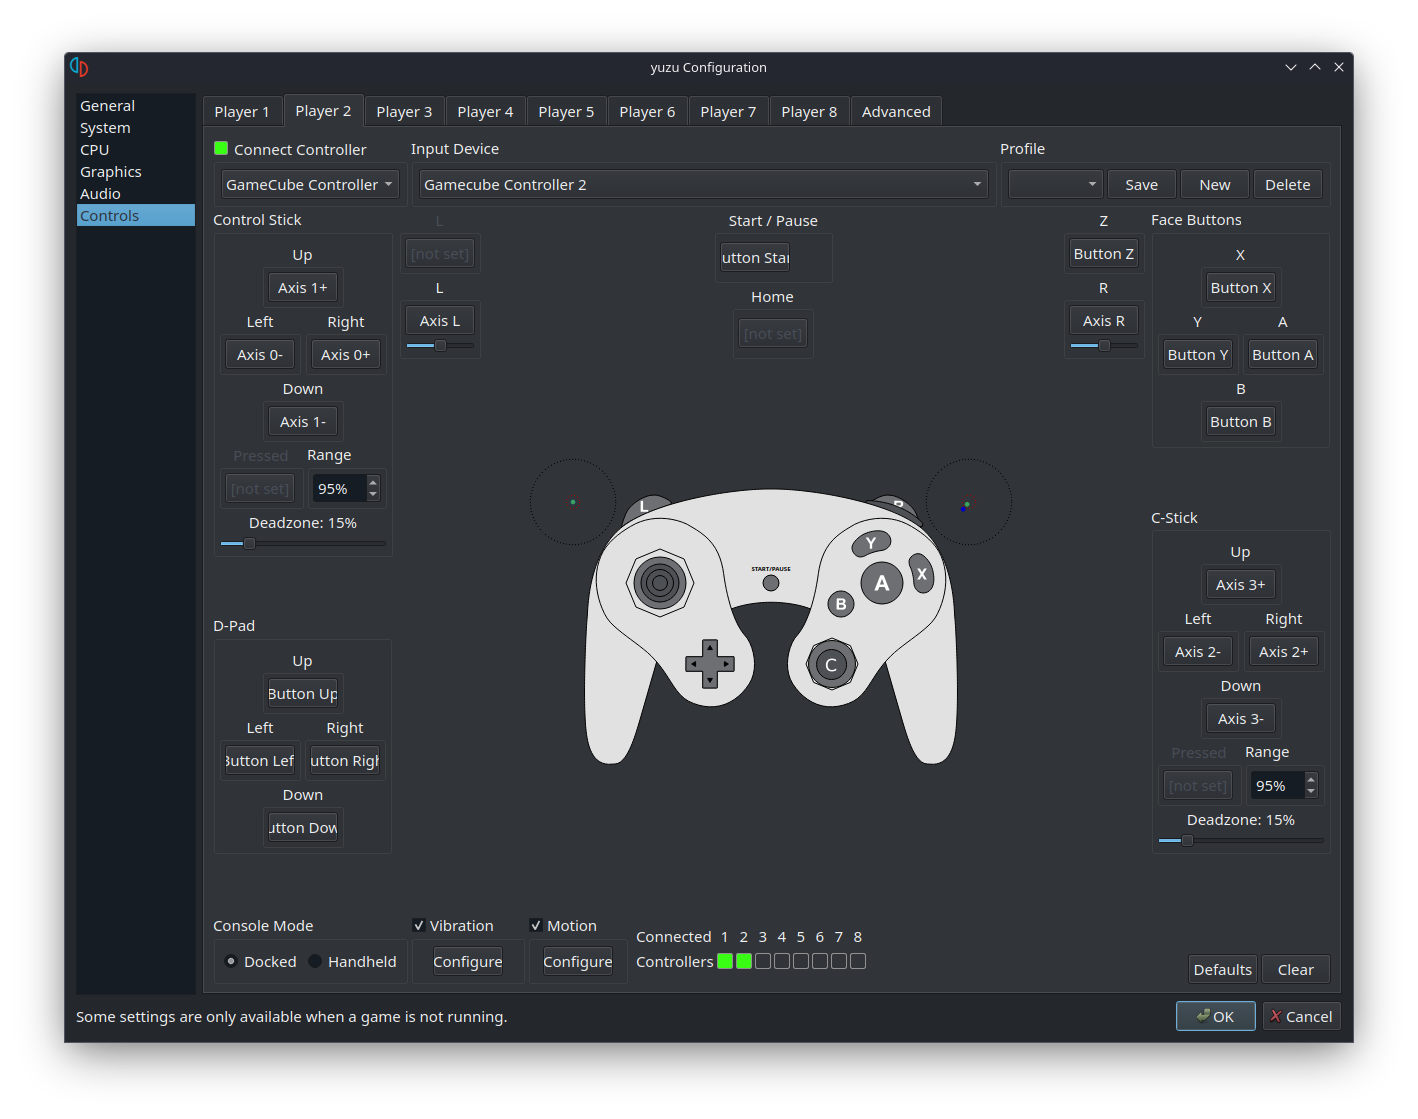
While you’re in the configuration menu it might be worth going over your controls again and making sure you have the controls that you want set up. Get your GCC adapter overclocked if you haven’t already for a snappier experience.
2. Verify File Contents
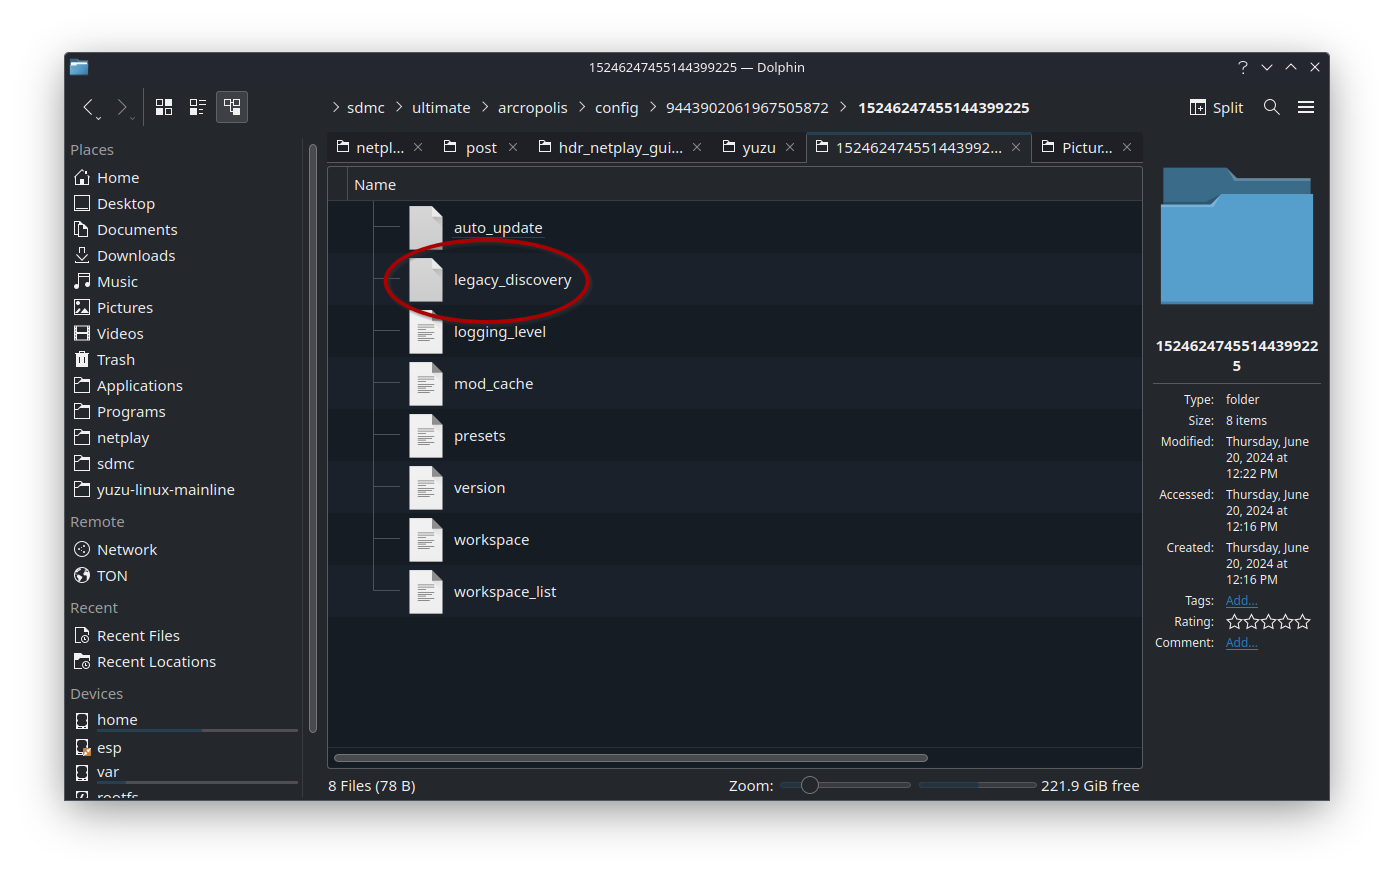
Open your file manager and go to ~/.local/share/yuzu/sdmc/ultimate/arcropolis/config/. (If you don’t see .local you’ll need to click the Hamburger icon on the top-right of the file manager and check “Show Hidden Files”.) There should be at least one folder containing a bunch of characters. Open it and there should be another folder with pretty much the same amount of characters. Ensure you have a empty legacy_discovery file here. If you ran the “Resources” function of my script from the first part of the HDR guide, it will have automatically made this file for you, but it may not work if you have multiple profiles present. If it’s not there, simply right-click -> Create New -> Empty File… and name it legacy_discovery. Repeat this process for any other folders you might have in ~/.local/share/yuzu/sdmc/ultimate/arcropolis/config/.
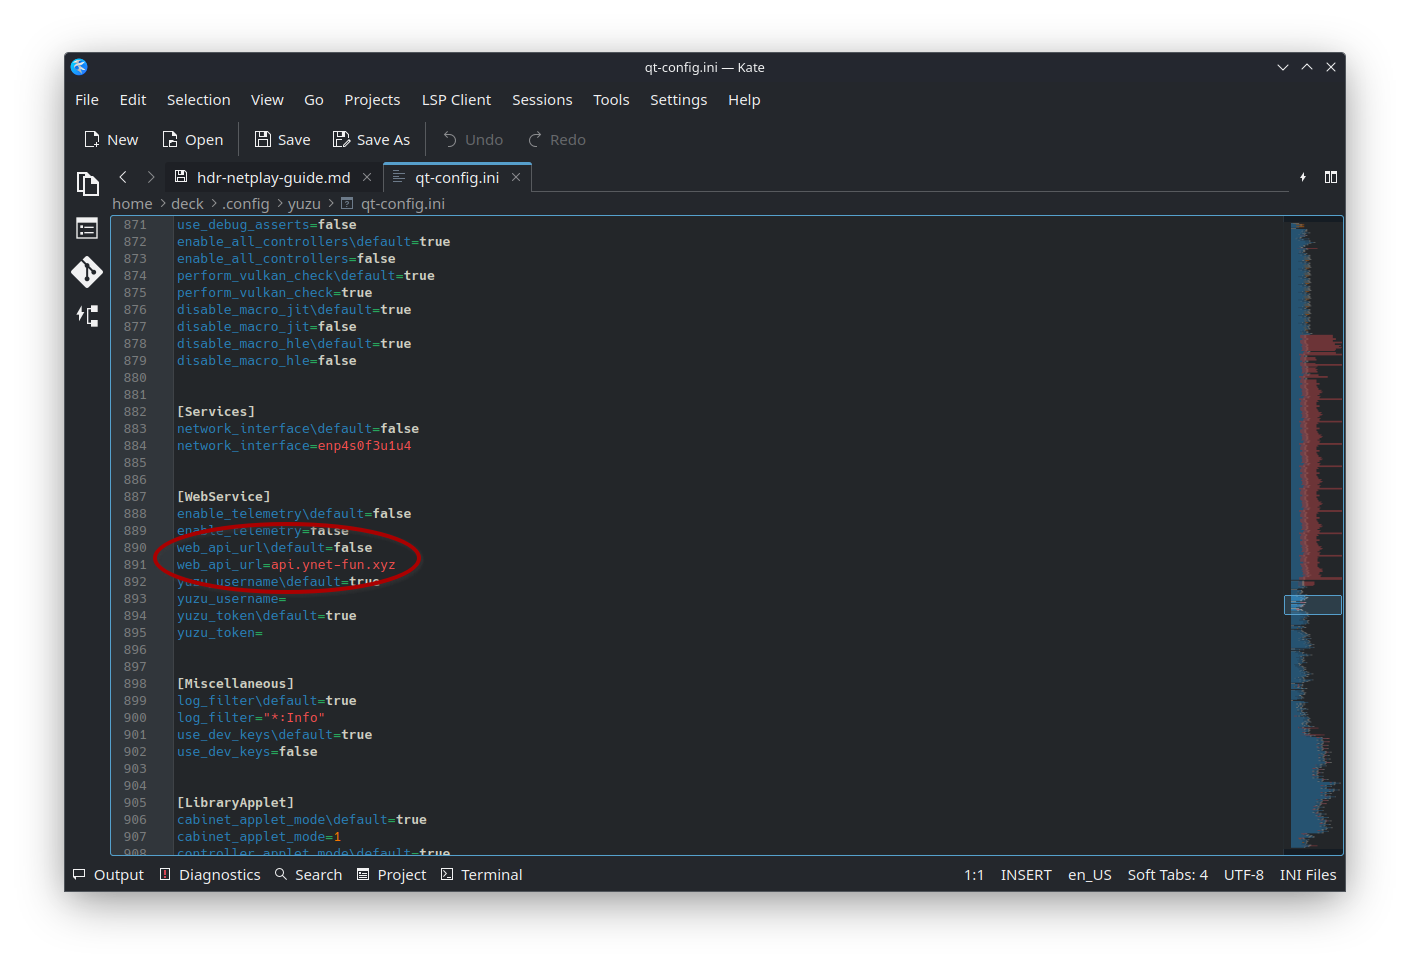
Next, go to ~/.config/yuzu/ and open the qt-config.ini file. Scroll a little more than halfway down the file. There will be a [WebService] section. Make sure you have the following properties set:
web_api_url\default=false
web_api_url=api.ynet-fun.xyz
If you ran the “Resources” function of my script from the first part of the HDR guide, it will have automatically set these values for you, but it never hurts to double-check to make sure the values are what they are above.
3. Find an Opponent
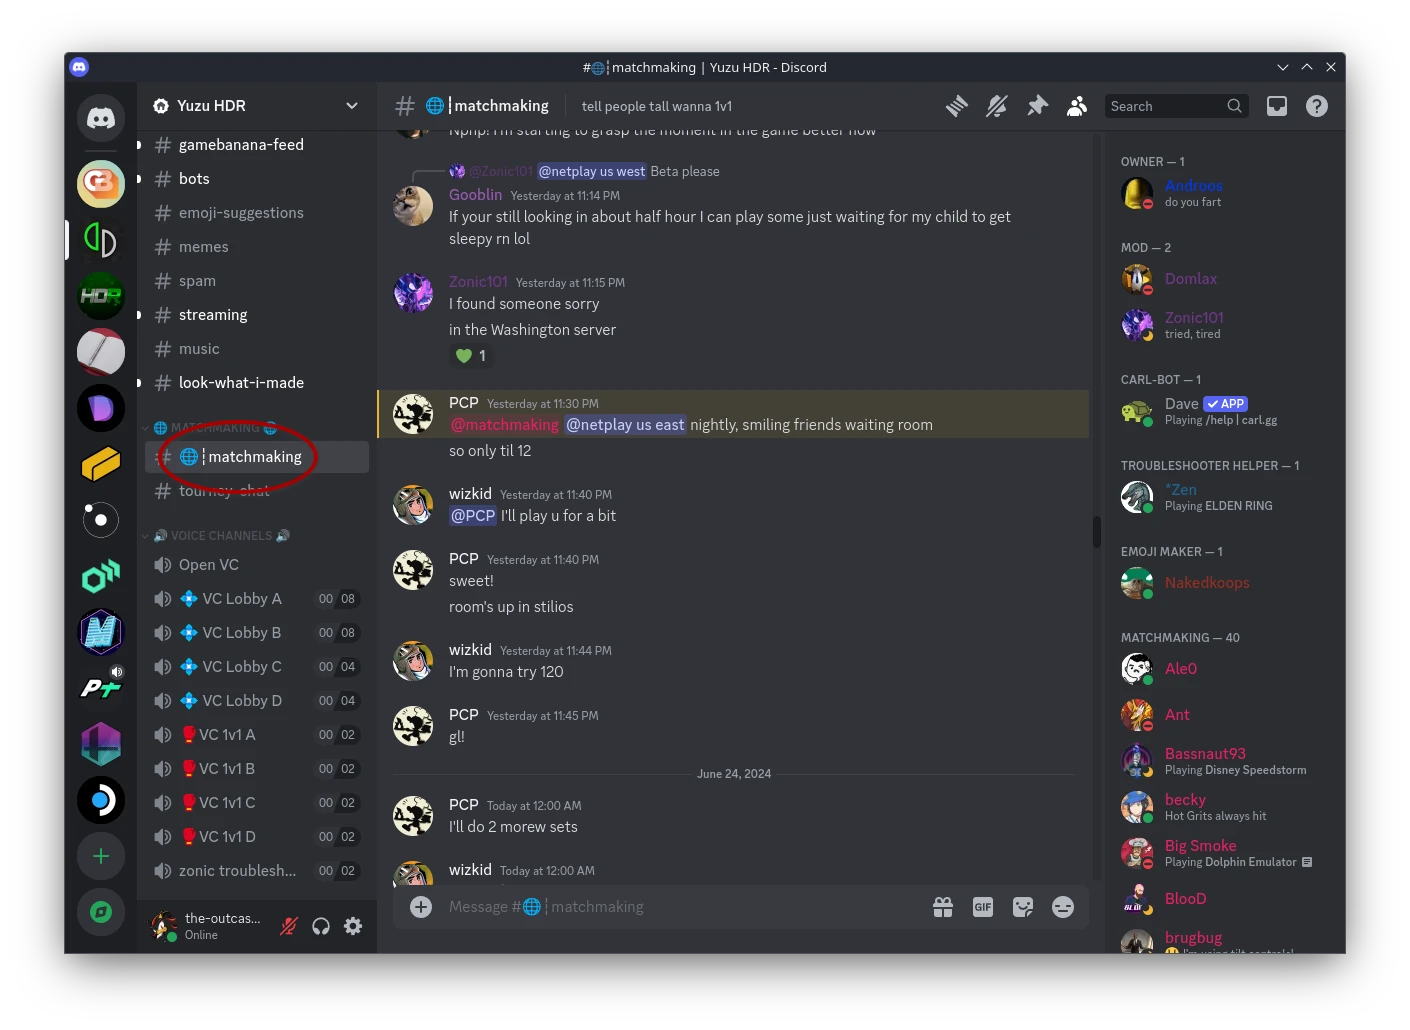
To find an opponent, there are two Discords that you can join for matchmaking: the Yuzu HDR Discord or the official HDR Discord. Head to the matchmaking channel and look for the region closest to you. Here you can ping others who are close or in the same region as you. Your opponent might want to verse using the nightly HDR branch. If so, you can easily switch to the nightly branch via the HDR Launcher. If your opponent is using the beta branch, you can also switch back to this at any time in the launcher.
4a. Using a Public Yuzu Server (Recommended)
After finding an opponent, launch Smash Ultimate. From the main menu, press Z and go to Local Wireless. In Yuzu, go to Multiplayer -> Browse Public Game Lobby. Filter the server list by putting in “hdr” in the Filters box. As of the time of writing this, there are seven servers that host HDR, each in a different region. Select the region that closest to you and your opponent. For instance, as someone who’s in the east coast, I would join either the Texas server or the Ohio server, depending on where my opponent is located. If my opponent was in the west coast, I would use the Texas server. If they were in the east or middle coast, I would use Ohio.
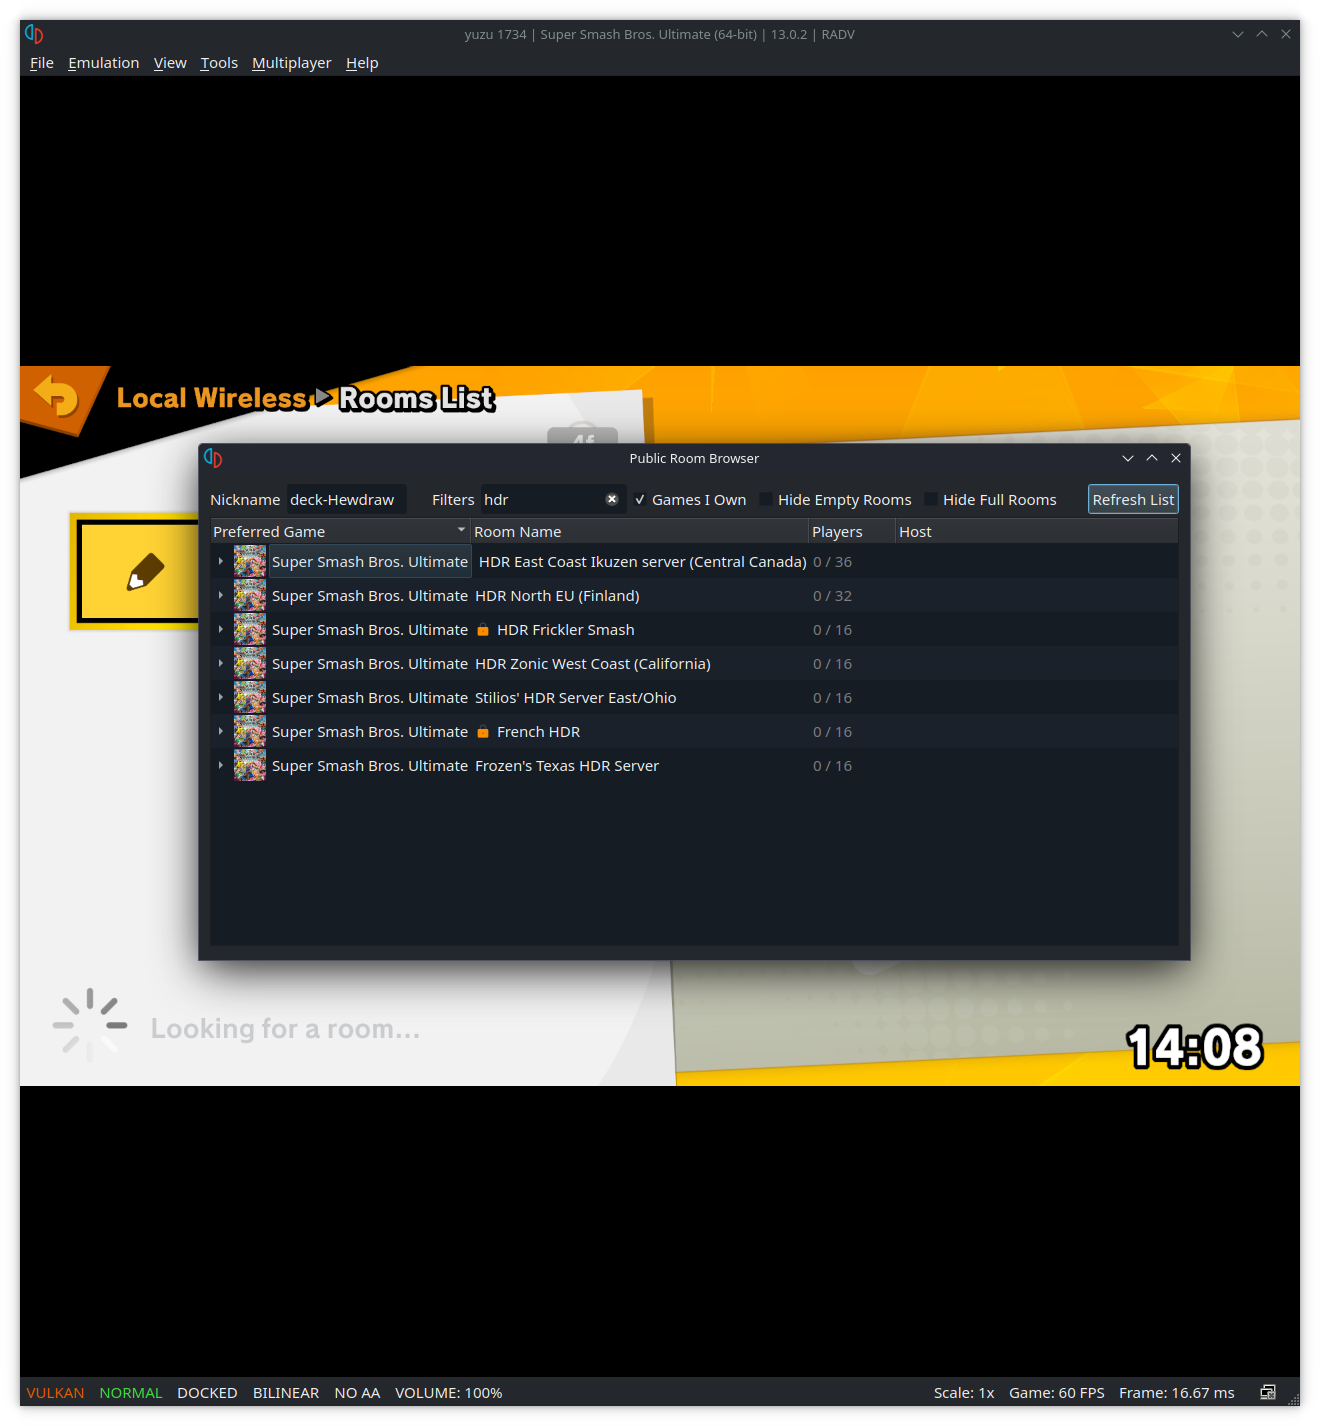
Note that joining a server can cause an instant kick if you don’t have the proper ending to your name. A good way of making sure you can join the lobby is by clicking the arrow next to the server to see who else is on that server. Observe the ending to their name. It might end in -HDR or -Hewdraw. Change your nickname to whatever you want, but make sure you add a hyphen at the end with either -HDR or -Hewdraw. For instance, my current nickname is steamdeck-Hewdraw. I can join any server that has members with -Hewdraw. If I wanted to join a different server though, I would need to change the nickname to steamdeck-HDR.
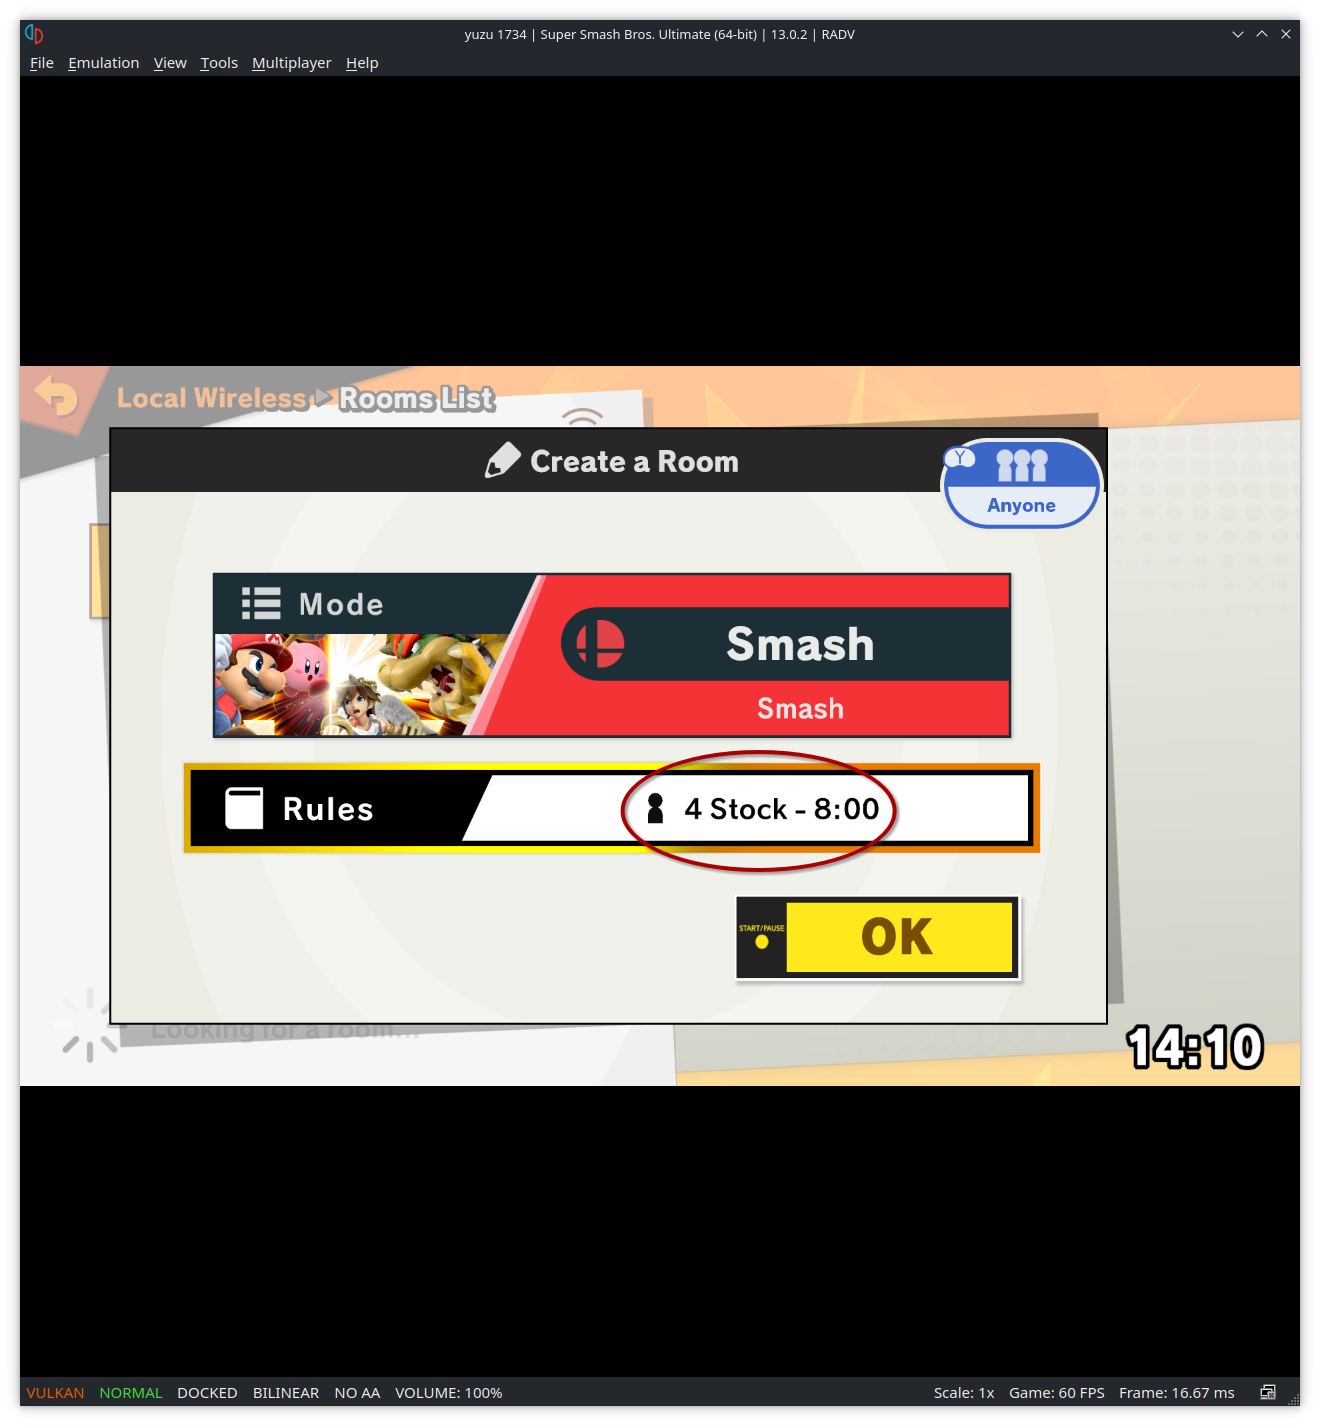
After joining the server, you may see a room in-game if your opponent is hosting. Join the room, and if they accept, choose a stage. Otherwise, if you’re hosting the room, make sure you have the “HDR Standard Ruleset” selected as the ruleset.
4b. Making your Own Server
If there is already a server that’s close to your region, I don’t recommend making your own server, as the process is a bit tedious. Still, it may be worth doing this if you can’t find any server that’s close.
Port Forwarding (Better Connection)
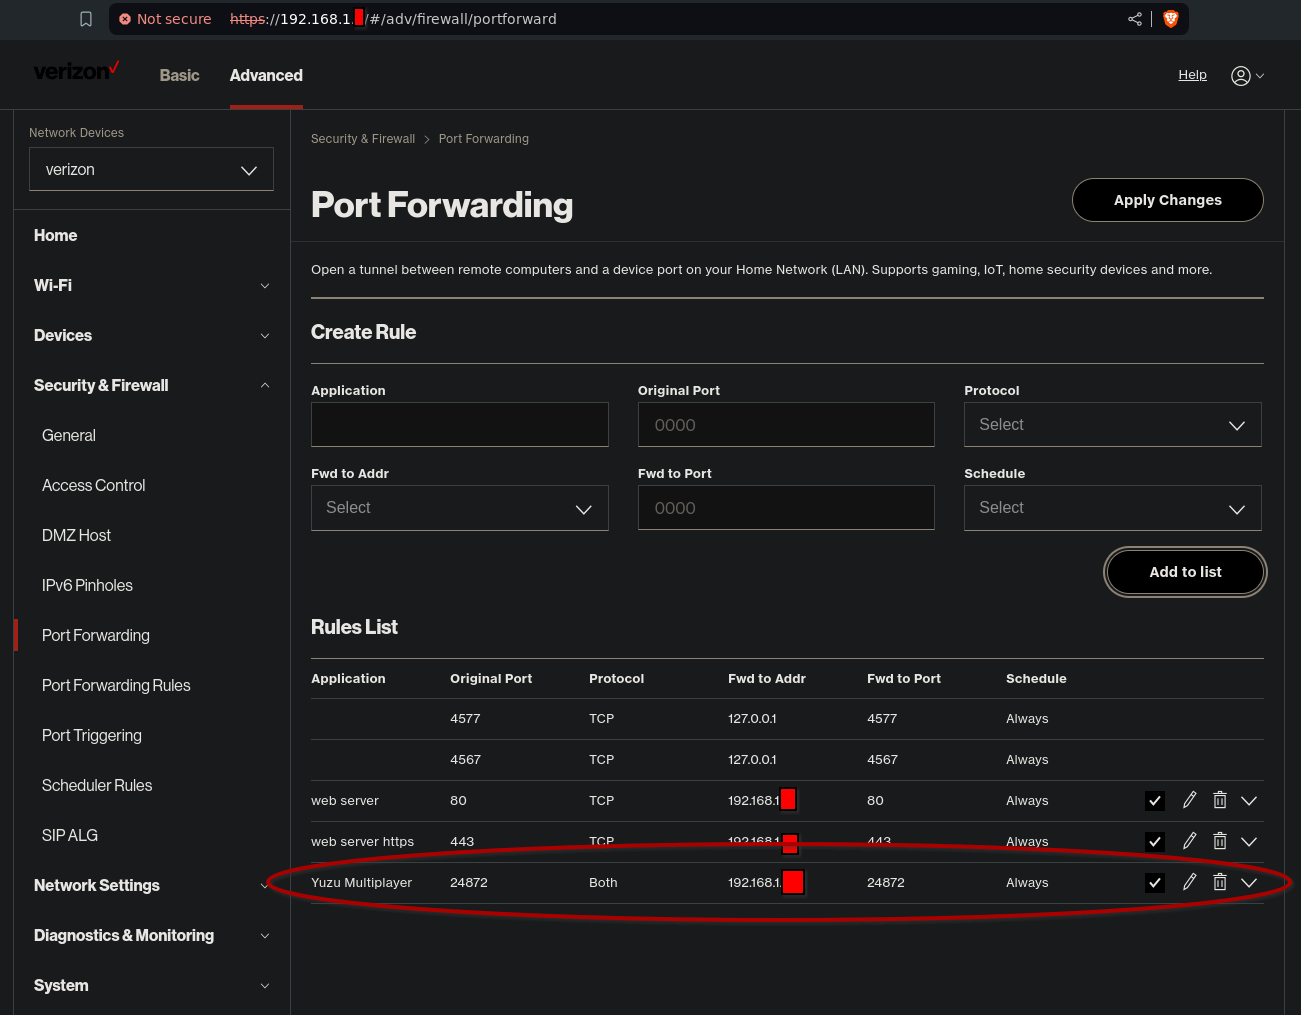
Port forwarding is different for each router out there. Doing a quick Google search for your router will show you how to open up your router settings and going to the appropriate section to adjust port forwarding settings. Usually it involves opening your web browser and putting in the local IP address of the router in the URL field, then entering a username and password to see the router settings. If you haven’t changed the username or password, you can usually find the default credentials on the router itself.
Forward port 24872 to the local IP address of the computer you’re using to play. If you’re on Steam Deck, you can find the IP address by going to the networking icon on the taskbar, selecting your connection by clicking the down arrow icon, and going to the Details tab. Make sure the port is using both TCP and UDP. You can see an example here with a Verizon router.
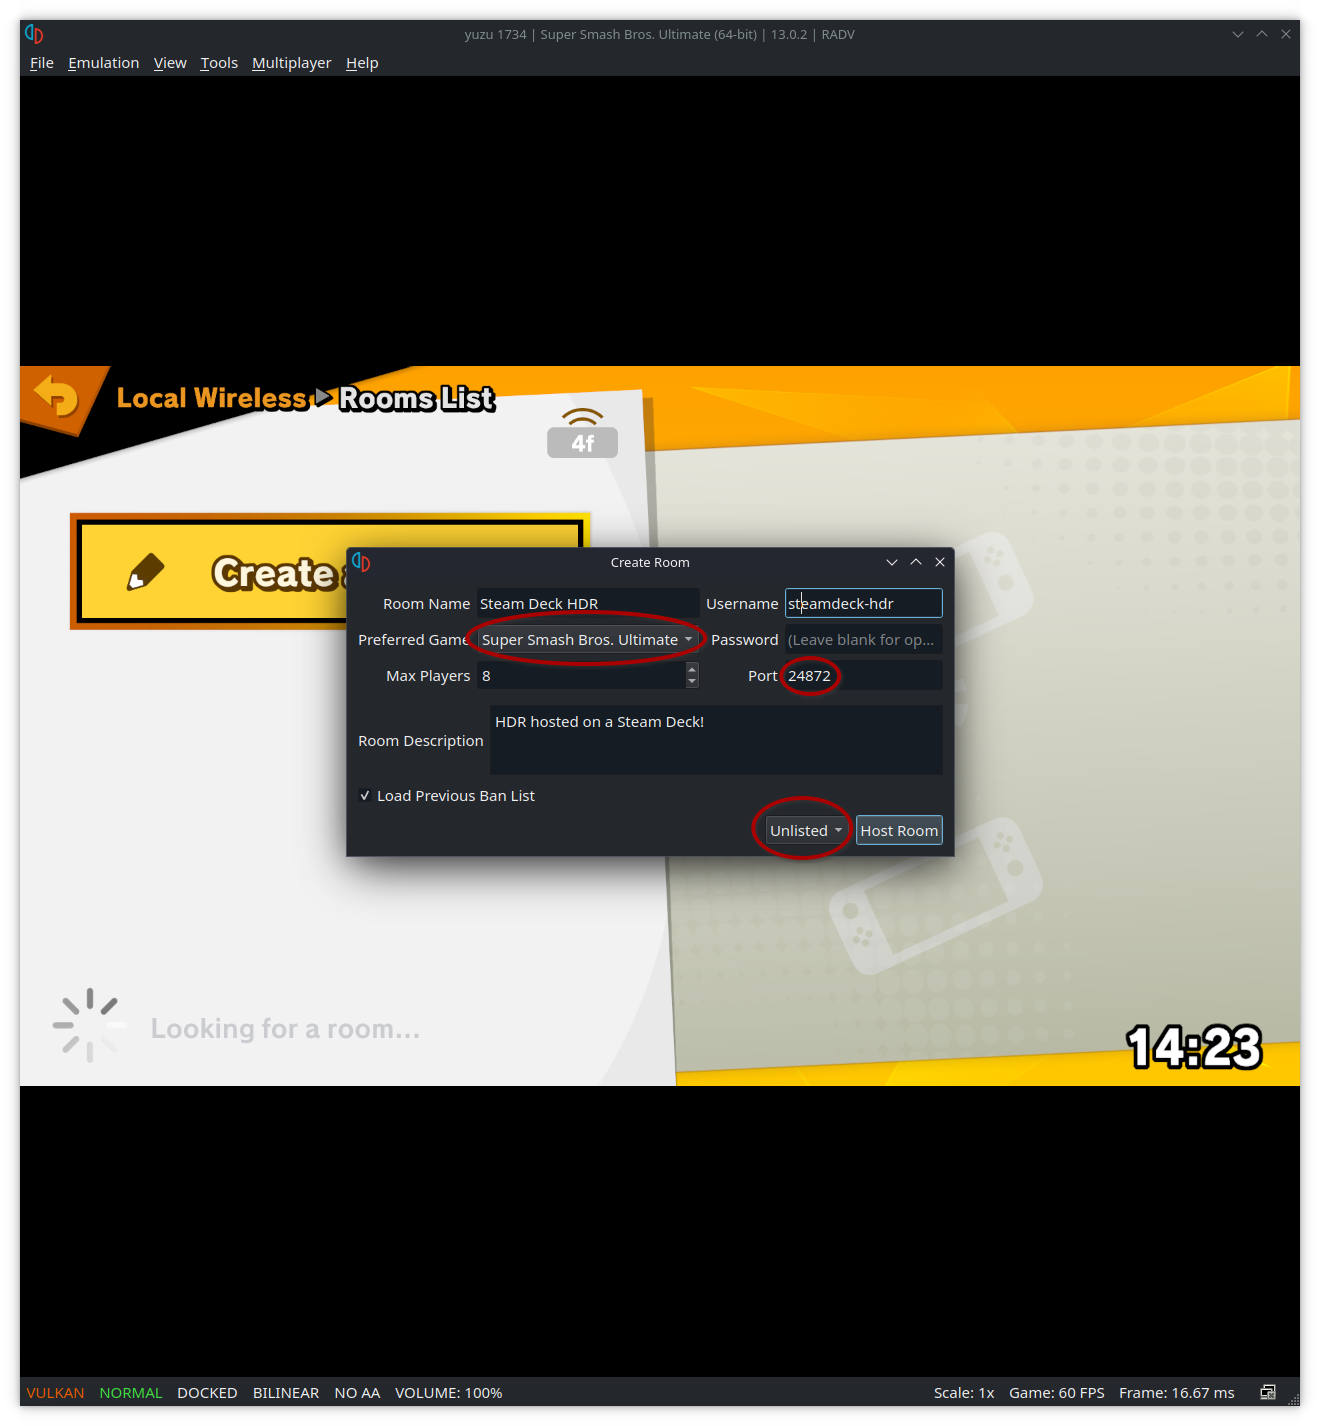
Now you’ll need to create a room in Yuzu. Go to Multiplayer -> Create Room. Give the room a name, set Smash Utlimate as the preferred game, set a password if you wish, the max amount of players allowed, port 24872 in the Port field, and leave a room description. Make sure the room is set as Unlisted in the drop-down menu; Public rooms don’t work due to needing a Yuzu web token, which is now defunct. Click “Host Room”.
From here, your opponent will join your server by going to Multiplayer -> Direct Connect to Room. Enter the public IP address of the computer that’s hosting the game. Again, another quick Google search will tell you what your global/public IP address is. Make sure port 24872 is set in the Port field. If the server has a password, enter this password in the appropriate field, set a nickname for yourself, then click “Connect”.

Amazon Web Services (AWS)
If you’d rather not forward any ports to your computer, or you don’t have access to your router’s settings, we can use AWS. We can use one of Amazon’s servers for free, up to one year. Follow the instructions on this Google Doc to get set up. I should note however that hosting a server with AWS won’t provide as reliable of a connection as port forwarding does.
5. Adjusting Controls and Latency
On the character selection screen, you’ll notice a buffer at the top. Here, you can adjust the buffer with left and right on the D-pad. Take whatever your opponent’s ping is and divide this number by eight to set the desired buffer. For instance, if your opponent has a ping of 40, adjust the buffer to 5. In most cases the default buffer of 4 is fine, but you may need to adjust this if you notice any laggy gameplay.
You can also set the framerate to 60, 120, 180, or 240. If you’re on the Steam Deck, keep this value to 60 FPS; higher FPS values will cause the game to stutter since the game will only go around 90 FPS at the max. Press the X button to change to 60++. 60++ will reduce the input delay from the Switch’s native 6 frames to 3-4 frames.
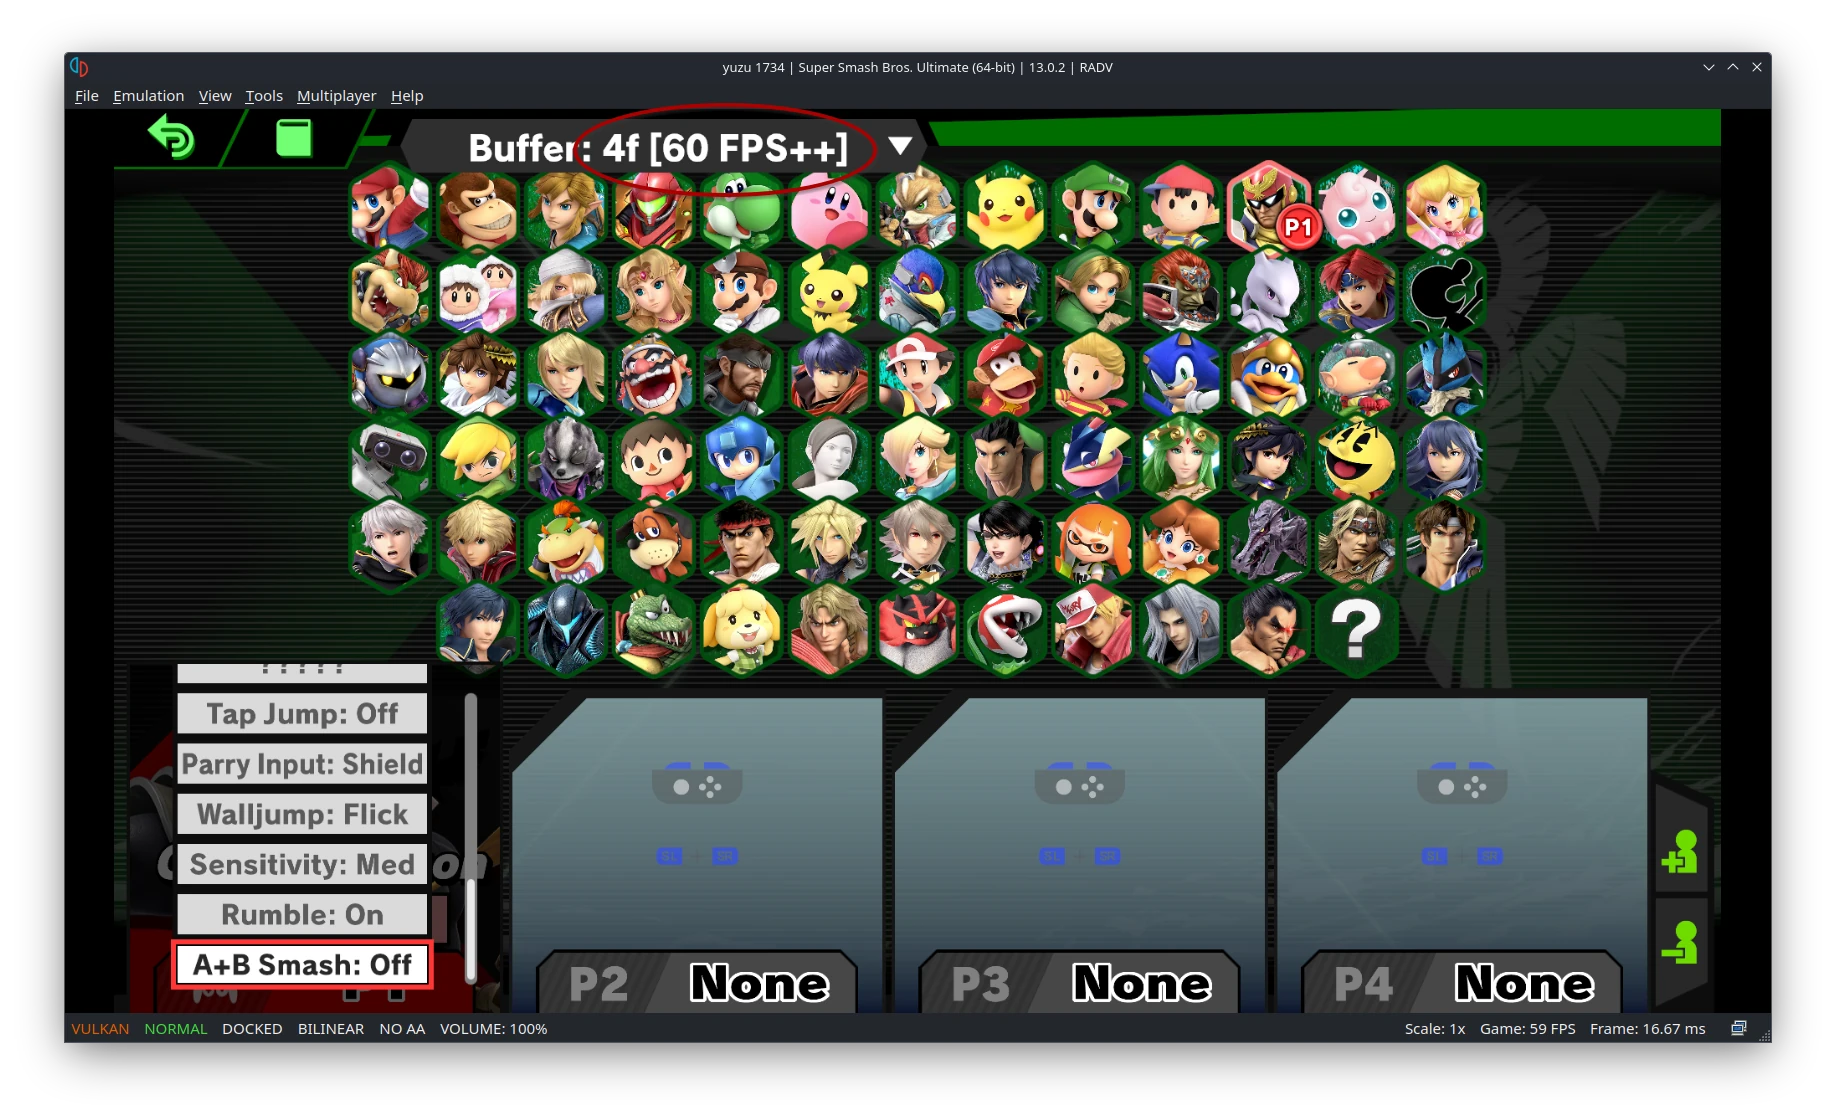
One more thing while you’re here in the CSS. Press the A button over the name of your character slot. Give yourself a name if you haven’t already. Press the Y button while hovering over your name in the name list. Here, you can adjust your controls to your liking. Select “GameCube”. If you want Tap Jump and A+B Smash off, you can do so here.
After you and your opponent are in the training stage, press L+R if you’re hosting to start the game (alternatively, you can just reduce the amount of characters in the CSS and the game will start automatically).
Need Help?
Join my Discord and I’ll see if I can help you out.
